Last night we carved pumpkins, Mr. Man, Miss Lu and I cut the tops off and gutted 4 large Pumpkins. Lu is 7 so she is a lot of help she cut the eye holes in hers (the one with square eyes)and did some work around the mouth. She also designed her mom's pumpkin (the one with the round eyes). Mr. Man is 3 he wasn't as much help he picked out a train for me to carve then changed his mind about 15 times while I was doing it. He did however help pull out guts and separate the seeds from the slimy pulp.
Today we went Trick or Treating in another suburb it started at 1:00. The plan was to Trick or Treat early then come home and sit with our neighbors and hand out candy. Both kids were excited to at the start, Mr. Man discovered that he could get candy just for following the big kids to a stranger's door and asking. When we were about halfway through he was done and needed carried. I know that the scale says that he weighs a mere 35 pounds, after carrying him around a cul-da-sac riddled neighborhood for about half an hour he seemed to weigh about 300 pounds. When we got home we baked off the pumpkin seeds and spent the evening with our neighbors.
Pumpkin seeds:
The seeds from about 2 Pumpkins
enough Vegetable oil to coat
Salt
Garlic Powder
Parmesan Cheese
Pre heat the oven to 350 spread the seeds out on a baking sheet and bake for 25 minutes stirring a few times to toast evenly. When they are crispy and starting to brown they are done. Best served hot.
Saturday, October 31, 2009
Wednesday, October 28, 2009
Balsamic Marinated Chicken
Hello, my name is Bryan and I am a food snob... I didn't think I was a food snob, in fact I was pretty sure that I was open and accepting of all kinds of food, I have eaten my share of freezer burned dinners and burritos from Aldis. However there were several events that came to a head a few years ago that acted as a bit of an intervention for me.
The first event: My beautiful wife Kris and I were newlyweds, she offered to make dinner for me, she pulled out a box of Shake and Bake for the chicken she had thawed. I said "honey why use Shake and Bake I have toasted brioche bread crumbs in the pantry that we can use."
She gave me that look that I would later learn she gives when she is thinking "really, are you sure you aren't gay?" but thankfully she just said, "you are such a food snob!"
The Second Event: Only a few days later I was at work, we were planning a big catering event (about $45,000) one of my co workers had said that she ordered the Sushi for one of the tables and would have it in the day before the event. I asked if it was a good idea to get the Sushi Platters in 36 hours before the event would take place. My co worker said it would be fine because most of them were veggie (California Rolls) or made with Krab Delights.
I calmly said "If you can't legally spell crab with the letter "C" it isn't crab and just because you roll it in sticky rice doesn't mean it is Sushi." My boss pulled me out of the office and told me that I needed to shut up because I was being a food snob again, again?!? can you believe that?
The third event: A few days after that I was taking my oldest girls back to their mom after a weekend visit. We used to meet at a Perkin's Restaurant in Madison WI. I talked a little bit about the catering event and said, "can you believe my boss called me a food snob?" My ex wife, her husband, and my two oldest daughters all nodded their heads in unison. Maybe my food snobbery ruined my first marriage... well maybe not.
Anyway all of those events happened within a few days so I started to wonder, maybe I am a food snob. OK, probably, I mean none of these people had ever talked to each other before and they all came to the same conclusion. I have worked on it, like any addiction I can stray and get all uppity with food and get the attitude of, "well if you don't like that it is some sort of character fault of yours." Because it couldn't be that squid tentacles are actually kind of gross or that Preserved Lemons are impossibly tart.
Recently Kris posted this blog on a website that she frequents and someone made a comment like, "Brussels Sprouts, BLECH! and what is up with those dumplings, does he have any recipes that aren't weird?" I realized that I had fallen off the wagon again! I enjoy this forum, I like to try new ideas and combinations of food, but I do prepare food that makes some of the pickiest eaters that I know (Kris and our daughter) eat well.
This is one of those dishes, because it is so easy to prepare and just good it probably comes up about once a month.
Balsamic Marinated Chicken:
In a glass or stainless steel bowl mix
1/4 cup Balsamic Vinegar
1/2 cup Olive Oil
2 Cloves of roughly Minced Garlic
a TBS of Honey (it think, I have never measured)
Salt and Pepper
Stir the marinade with a fork until it is well mixed and adjust to your taste. Then add 2 Chicken Breasts. I usually set this up the night before so I can come home from work at 6:00 and still have time to make dinner before we are all starving. I usually make this on the grill, I put the chicken on a medium hot grill for about 4-5 minutes one each side. The last time I made it I served it with pasta, just a little butter Olive Oil and Parmesan Cheese.
Monday, October 26, 2009
Pumpkin Gnocchi
Kris' Parents are coming down to visit us a few days after Halloween. Kris' dad has always been happy to help us out with household projects, he put in laminate flooring throughout our entire house, he helped me put in a tub surround; by helped me I mean that he told me to stand in the corner of our bathroom until he told me what to do next. When they are here there are four subjects of conversation outside of what to fix next.
Topic 4 Bryan is a really good cook and he makes enough food for all of us.
These topics are:
Topic 1 Your house is messy, I keep tripping over clutter when I had kids the house was always neat as a pin.
Topic 2 Your kids are loud! I can't even here myself think! Kids didn't act like that when mine were little.
Topic 3 Bryan is a bad Carpenter, I have to tell him every step of the way what to do.
Topic 4 Bryan is a really good cook and he makes enough food for all of us.
Sure the subject can stray for a few minutes but usually we are back to one of the four several times an hour. I will bet you can guess which topic is my favorite. I try to keep the focus on topic 4 as much as I can, to that end once they pick a date to visit I start the menus in my head. I wanted something with a fall theme (you probably notice that) and something different, Kris' parents are not shy about eating or trying new things. I found a recipe for Pumpkin Dumplings in an old cookbook I tried but they weren't quite what I wanted. Then I started to think of Gnocchi (very dense Italian dumplings) these could hold up to sauteing and with a good sauce would go well with the Duck Breast and Pork Tenderloin that I plan to make for them.
You can start several days ahead by cooking a "pie pumpkin" (farmer's market lingo that I am picking up) or any small pumpkin would work. Cook it like you would a squash cut it in half, remove the seeds and put on a baking sheet with about half an inch of water... bake in a 350 oven for about an hour until tender. Once it is cool keep in in a covered container in the fridge. The pumpkin I made lasted a week and was enough for 3 batches like this (I said that I experimented a bit) plus a little left in the end. Before you mix these ingredients set a pan of water on the stove to boil.
Pumpkin Gnocchi:
1/2 cup Pumpkin Meat
1 Egg
1/2 tsp Salt
1/8 tsp Ground Nutmeg
1/8 tsp Ground Cinnamon
1/2 cup + 2 TBS All Purpose Flour
1/8 tsp Baking Soda
I mixed all of the ingredients with a fork until well blended then pulled the dough mixture out out of the bowl to make dumplings. I made them about a teaspoon at a time and dropped them into the boiling water to cook. They took about 10 minutes before they were done then I took them out with a slotted spoon and put then into a colander to rest. Once they were all out I started the sauce it was:
1/4 cup bourbon
1/4 cup brown Sugar
1 TBS Butter
This is the best sauce ever by the way, I set that all on the back burner to cook over low heat stirring occasionally while I cooked the dumplings in butter on high heat sauteing for about 5 minutes. Then I pored the sauce over the dumplings for and cooked for a few minutes more. When the in laws are here I think I am going to make them a little smaller (maybe half teaspoon) but I think I got it right the third time.
Saturday, October 24, 2009
Brussels Sprouts
So I know that I have some readers (thank you by the way) but recently someone decided to admit it. I have a follower! someone who not only reads this blog but is brave enough to let others find out. She made a comment about one of my posts where I offered (translate that to threatened) to buy the kids Brussels Sprouts when we were at the local farmers market. Her comment was something like, "I made a pact with my boys to NEVER bring those awful things into our house." Of course that was shortly after I bought a whole mess of them to cook for an Autumn themed post.
My earliest memory of Brussels Sprouts dates back 35 years or so, my brother was sitting across the table from me in the dining room of our trailer home. My mom was saying something along the lines of, "you boys need to eat you vegetables, they make you strong."
As I was quietly forcing them down one miserable bite at a time my younger brother said, "I can't eat them, they make my throw up."
"Honey, they won't make you throw up, try them."
"I can't, they make me throw up."
This was one of my first parenting lessons (at the age of 7 no less) If your kid thinks that something will make them throw up, guess what, IT WILL! I watched my 5 year old brother pick up half of a Brussels Sprout on he end of his fork slowly lift it to his mouth and then the inevitable happened.
I of course jumped up on my chair, over the back and ran down the hall screaming and waving my hands in the air as if angry bees were coming out of him.
I didn't even look at Brussels Sprouts for about 14 years when I was in college and the topic of discussion was do they look more like turtle heads or Barbie cabbages, fine arts majors have too much time on their hands.
Anyway this post falls under the theme of "everything tastes good if it is cooked with Bacon."
Harvest style Brussels Sprouts:
2 slices of Bacon cut up
1 small Onion diced
1 Carrot peeled and sliced
10-12 Brussels Sprouts cut in half
Salt and Pepper
Cook the Bacon in a small Saute pan when it is close to done add the Onion and Saute until tender. Then add the Carrot and Brussels Sprouts and cook for 2-3 minutes then add just a little water, cover and cook for about 10 minutes. Once they have steamed until tender they are ready to serve. I hope that I didn't alienate my only follower with this post.
Tuesday, October 20, 2009
Asian Dumplings aided by Little Fingers
Some foods are a lot more fun if you have little hands to help. This dish had been in the back of my mind for a couple of weeks actually, but I didn't want to make it by myself. The process was simple and too much fun for a grown man to do by himself. Plus I enjoy having little fingers to help me cook sometimes, I feel like I am passing something along. It was a quiet Saturday afternoon, my son needed (fought it but needed) a nap, so did Kris only she didn't fight it as much. I put the boy down while Kris went into my youngest daughter's bedroom to nap with her. I laid down on the couch with a cup of nap juice (3 oz of Vodka with 3 ice cubes) and a dull book kind of hoping to do the same. After about 15 minutes my girl told me that she couldn't sleep, she was trying as hard as she could but she just couldn't do it. I couldn't either so asked her if she wanted help me cook, what else would you do with a seven year old? Actually it is a good distraction, watching TV only would have held her attention for a few minutes until she remembered how boring I can be and then she would have started looking for a way to accidentally wake people up. Besides we have a lot of fun cooking together, eating is another thing but I will take what I can get.
We had ground pork in the freezer to start with for the Wontons we used:
The process is a a simple one; heat the oil on a saute pan and start cooking the Garlic once that is done add the Ground Pork. While those are is cooking together shred a Carrot and cut the Napa Cabbage in a Chiffonade. Once the Pork is cooked through add the the Carrot, Napa Cabbage, Ginger and Soy Sauce and saute until the Napa Cabbage is wilted maybe 3-4 minutes, I didn't time it. Remove your pan from the heat and add the grated Lemon Peel. Mix it all together and let it sit to cool while you get the Wonton skins ready. Take the mixture a tsp or so at a time and put it into the center of a Wonton wrapper then wet the edges, I like to fold them neatly into perfect triangles and set aside. I was told however that I am uptight and other ways work better. Some of those suggestions were folded like an envelope, rolled up with the ends open, corners pulled to the top and my favorite wadded up into a tight ball.
Usually I would drop these dumplings into boiling water but I think some of them with improved shapes and wrapping techniques would have had trouble standing up to the rigors of boiling water. I decided to steam these to finish the cooking process. After they steamed for about 5 -7 minutes they were ready to go. A lot of fun to make and they tasted good the fresh ginger is such a nice flavor, of course the girl treated them as if they were stuffed with hemlock.
We had ground pork in the freezer to start with for the Wontons we used:
2 Cloves of Minced Garlic
2 tsp Vegetable Oil
3/4 pound of Ground Pork
1 TBLS Minced Fresh Ginger
1 Carrot
1 head of Napa Cabbage
Soy Sauce to tasteGrated rind from one Lemon
1 pack of Wonton Skins
The process is a a simple one; heat the oil on a saute pan and start cooking the Garlic once that is done add the Ground Pork. While those are is cooking together shred a Carrot and cut the Napa Cabbage in a Chiffonade. Once the Pork is cooked through add the the Carrot, Napa Cabbage, Ginger and Soy Sauce and saute until the Napa Cabbage is wilted maybe 3-4 minutes, I didn't time it. Remove your pan from the heat and add the grated Lemon Peel. Mix it all together and let it sit to cool while you get the Wonton skins ready. Take the mixture a tsp or so at a time and put it into the center of a Wonton wrapper then wet the edges, I like to fold them neatly into perfect triangles and set aside. I was told however that I am uptight and other ways work better. Some of those suggestions were folded like an envelope, rolled up with the ends open, corners pulled to the top and my favorite wadded up into a tight ball.
Usually I would drop these dumplings into boiling water but I think some of them with improved shapes and wrapping techniques would have had trouble standing up to the rigors of boiling water. I decided to steam these to finish the cooking process. After they steamed for about 5 -7 minutes they were ready to go. A lot of fun to make and they tasted good the fresh ginger is such a nice flavor, of course the girl treated them as if they were stuffed with hemlock.
Sunday, October 18, 2009
Bread Pudding
When it comes to writing recipes for this blog I can classify them three ways, recipes that are classics that I may or may not have written down, but have been in my repertoire for years Roast Corn and Black Beans are two examples of those. I also make up new concoctions of things that I think would taste good for example Caprese Mole and Sugar Cane Skewered Shrimp were both made up on the fly. The Third Category are the recipes that I have to study before I prepare them things that I have never made fall into that category, like preserved Lemons and most baked goods do too, the complexities of leavening agents and the ratios of liquids that make a custard still scare me.
Bread pudding has always been a favorite of mine, but it falls into that third category I really like it, but don't make it often, because I need measuring cups and a recipe. Bread Pudding can go well with a cup of coffee in the afternoon or add a little caramel sauce and it is a great dessert. The thing I always liked about it is that at the places that I used to get bread pudding it was never the same thing twice; the baker would take the bread, muffins, scones and donuts that didn't sell one day and throw them into a mixer and sell them as bread pudding the next. As I started to look for recipes most of the ones I found started with fresh bread. Something seems wrong in going out and buying a fresh loaf of Brioche or French Bread then cutting it into cubes and leaving it on the counter over night to use. So I started looking at the ratios of bread to eggs to milk figuring that if I got that part down the rest would come together just fine. What I found was that in most cases the recipes called for 1 pound of bread, 4 cups of dairy (some cream some milk, some a combination of them) and 8 eggs. After those basic ingredients the recipes were all over the place some with chocolate chips, nuts, currants, cranberries pretty much anything seems to work after the base is together, which makes this fun.
The Bread pudding that I made was:
1 pound of bread (I had donuts, bagels and French bread in this)
2 cups half and half (it is all I had)
2 cups milk
8 eggs
1tsp vanilla
1 cup of brown sugar
1 cup of diced dried figs
Yes I am that guy, the one that doesn't have raisins in the house but does have a big bag of dried figs in the refrigerator. Dice up the assorted bread and set in a large bowl then mix the rest of the ingredients except for the Figs (nuts, currents, whatever you decide to use) and poor over the bread mixture. This needs to sit for a while until to soften the bread if you used heavy bread (like baguettes) you may want to wait as long as 1-2 hours. Now is a good time to preheat your oven to 325 and grease a 9x13 inch baking pan. Mix any additional items into the mess that you have and poor it into the pan.
This Bakes for about an hour and 15 minutes until a knife or toothpick comes out clean when inserted. When it first comes out of the oven it looks like a giant Souffle but it pretty quickly "falls" to what you expected. I am getting a little ahead of myself here... the sauce for this is so good!
1/2 Stick of Butter
1/2 Cup Sugar
3/4 Cup milk
1/2 Cup Baileys Irish Cream
a little Cornstarch slurry
Melt the butter and sugar together then add the milk and Irish Cream once that is simmering add the cornstarch slurry to thicken. Let it cook for a few minutes until it is the thickness that you want. When you are ready to serve just poor a little bit of the sauce on top of a piece of bread pudding and serve.
Saturday, October 17, 2009
The Basics Roasted Peppers
Roasted peppers come up kind of often in my cooking most recently in the Pumpkin Soup that I made in my last post. Fresh Bell Peppers have a bright crisp taste and texture that is almost spring like, they kind of pop when you eat them and have a crunch that makes me happy. Roasting makes them a different creature altogether that bright spring like pop of flavor and crunch is replaced by a softer more complex taste and feel with smokey undertones to them that is so nice in the fall.
The pepper that I am roasting here is a red bell pepper because that is what I needed for the Pumpkin Soup I also roast Poblanos for Chili Rellanos and other chili peppers for a number of applications. To roast peppers simply turn the flame on a gas stove to high and put the pepper right on top of it, turn it often to get all sides (please no comments about my dirty stove). When the peel is all black and starting to bubble and burn (see the picture below) put the pepper(s) into a zip lock bag for about 10 to 15 minutes to steam, then run under cold water and the skin comes right off with just a quick brush of your fingers.
I will give this warning, about half way through the process Kris came into the kitchen and asked if something was burning. Of course I had to answer yes, I don't always think about the side effects of different cooking techniques, this does make for a little smoke and smells kind of strong, you may want to throw these on the grill when you are cooking outside or at least turn on the oven vent so your house dosn't smell of smoke for the rest of the day..
Sunday, October 11, 2009
Pumpkin Soup
When I bought the beets that I wrote about in my last post I had kids in tow they wanted something from the farmer's market too. I offered them Beets, Parsnips, Rutabagas, Squash, Brussels Sprouts, home made Pickles... Oddly they weren't interested in any of those, go figure, what they did want was small Pumpkins and some Mums for their mom, who would need a gift because she would miss them so much while we were out with me for an hour. The pumpkins were too small and purchased too early to be Jack o Lanterns. So I told the kids that I would buy them but I was going to cook them in a week or so. Nobody minded, right after they showed them to their mom the pumpkins sat on the kitchen table ignored until I got to them yesterday. It is hard to describe the size of the Pumpkin that I used, about 1/2 the size of a basket ball, it was from the "Small Pumpkin" bin at the market.
I make pumpkin soup out of one of them the ingredients are:
2 Carrots peeled and coarsely chopped
1 medium onion chopped
1/2 stick butter
1/2 stick butter
1 small Pumpkin trimmed, peeled and cut into 1 inch cubes
5 cups of Chicken Broth
6 whole Cloves
1/4 tsp Nutmeg
3/4 cup Half and Half
Start by melting the butter in a 2 quart saucepan then softening the Carrots, Celery and Onions. I takes about 10 minutes then add the rest of the ingredients except for the Half and Half. Cook this covered until all of the ingredients are soft about 45 minutes in this case. You should stir fairly often to check it and get an idea how long it will take. When the pumpkin is soft dig around a little bit and try to pull the cloves out, if you miss any they will end up being a little stick in someones soup. Then put the mixture to the blender about 1/3 at a time then poor back into the saucepan. Once it is blended smooth add the 3/4 cup of half and half and mix, you may want to add a little bit of honey to sweeten it up here taste it and decide for yourself.
This bowl is garnished with a little Roasted Red Pepper Cream to add color, I will talk about roasting peppers later but this is one Red Bell Pepper roasted and peeled then mixed with enough half and half to puree, very simple. I carefully added it with a teaspoon just before I served.
The soup is a great start to a fall meal simple, really beautiful and so creamy. Really it is like eating liquid silk it is so smooth.
Saturday, October 10, 2009
Roasted Beets
I picked up some beets at the farmer's market a few days ago, I wanted to do something a little different with them. I like fresh Beets roasted on a salad or cooked in an orange reduction until they are tender and full of that earthy autumn flavor that they carry. This time I made them in a salt dome. Working with a salt dome is kind of fun, like building a sandcastle around your food.
After the Beets have cooked for their allotted time take them out of the oven and let them cool for about 15-20 minutes (depending on how calloused your hands are) until they are cool enough to handle. At this point they look like a cross between the eggs from "Alien" and the pods from "Cocoon." Once they are cool enough to handle crack open the salt dome and there they are! Peel the Beets and slice them up, drizzle them with a little yogurt sauce and serve them hot or a room temperature.
To make this you will need:
3 medium Beets
1 1/2 cup of Kosher Salt
2 TBLS Horseradish
1 TBLS Grated Orange Peel
1 TBLS Chopped Fresh Thyme
a little fresh orange juice I squeezed 1/2 the orange into the mixture
1 Egg White
Pre heat your oven to 425 f, then wash and trim the beets really well (leaving the skin on) and set them aside while you mix the rest of the ingredients together on a bowl, it should be about the consistency of wet sand. using about a Tablespoon of salt for each pile put 3 piles of salt on a baking sheet. To make the salt dome grab a handful of the salt mixture and pack it around your first beet like a snowball it should be about 1/4 of an inch thick and cover the entire vegetable. when it is done set it on one if your salt piles then repeat the process two more times. Put the pan in the oven and let it cook for about an hour and 15 minutes. The salt dome quickly dries out and becomes a mini oven around the Beets locking in moisture while gently infusing them with the flavors of Orange, Thyme, and Horseradish.
While these are baking make you can make the sauce to drizzle over them for this I used
1/4 cup Low Fat Yogurt
2 tsp horseradish
A splash of red wine (to make a pinkish color)
The juice from the other half of the orange I used earlier
Mix it all until smooth and set aside until you are ready
After the Beets have cooked for their allotted time take them out of the oven and let them cool for about 15-20 minutes (depending on how calloused your hands are) until they are cool enough to handle. At this point they look like a cross between the eggs from "Alien" and the pods from "Cocoon." Once they are cool enough to handle crack open the salt dome and there they are! Peel the Beets and slice them up, drizzle them with a little yogurt sauce and serve them hot or a room temperature.
Tuesday, October 6, 2009
Gravlax
I am not sure exactly why, but as fall comes around I get the urge to make Gravlax, Cured Salmon. If you haven't had it, Gravlax is a salt cured salmon, the flavor is bold, but simple. The word is actually Scandinavian word "Grav" literally "Grave" in this case really "hole in the ground" and "Lax" which is "Salmon." So translated it is "Salmon in a hole in the ground" originally Gravlax would be prepared by digging a hole on the beach and putting a salted fillet of Salmon in and burying it for a few days.
That being said to make this beautiful dish at home I won't ask you to look for a shovel or sand. To start with you want to get a salmon fillet that has been commercially frozen, at least -10 f for at least 7 days, this kills any potential parasites without cooking. The ingredients that I used are:
1 skin on Salmon fillet about 10 oz
2 TBLS Kosher Salt
2 TBLS Sugar
2 tsp fresh cracked Black Pepper
A whole mess of fresh Dill
Mix the Salt, Sugar and Pepper together in a small bowl and set aside. Take the Salmon fillet and poke a few holes in the skin then sprinkle it lightly with the salt sugar mixture then set it skin side down on a piece of plastic wrap. Put the rest of the salt sugar mixture on the salmon flesh then top with the fresh dill. I can't say exactly say how much dill to put on top (I have never measured) when the amount that you have piled on the fish seems absurd you are probably about there.
Wrap the Salmon tightly then wrap the wrapped Salmon again. After it is wrapped tightly twice set it in a pan so you catch the liquid that leaks out (yes it will, I don't care how well you wrap it). There is some discussion here as to how to cure it. I put the Salmon in the refrigerator for at least 48 hours (I can't wait much longer than that) I turn the package over when I get up in the morning and before bed at night. Some traditional cooks say to put a brick on top of the fish, I have tried that but don't get much of a difference in the end product. When it is done slice it thin on the bias and serve it up. Here it is pictured above on a whole wheat bagel chip with cream cheese.
Saturday, October 3, 2009
Sugar Cane Skewered Shrimp
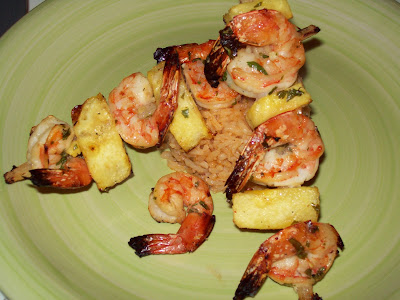
This is a simple recipe but very nice, I had a Sugar Cane Baton from a previous shopping trip and wanted to make Sugar Cane Skewered Shrimp. Yesterday on my way home from work I picked up the best shrimp ever for $7.99 per pound! I wanted raw Shrimp for this dish, what I found was called "Easy Peel Shrimp" Sounded good enough I figured I would go home and peel then devain these guys and be ready to go. This shrimp was shell on but the vein was removed! it is such a tedious job to devein them. All I had to do was peel the shells off (I set those aside) then put the shrimp in some marinade.
I cut my Sugar Cane into Skewers about 6 inches long and a little smaller that 1/4 inch thick. It cut into strips very easily, I just ran the knife from top to bottom then I cut a Pineapple into chunks. Then I skewered the shrimp and pineapple alternating, when the Rice was about 10 minutes from done I put the skewered shrimp in the grill and cooked it on a cooler spot for about 10 minutes turning once.
for the marinade I used:
2 coves of minced Garlic
1 cup of Orange Juice
1 TBS Honey
1 TBS Chopped Cilantro
a splash of rice wine vinegar
salt and pepper to taste
I put the peeled shrimp into the marinade, covered it and set it in the refrigerator while I got the other ingredients ready. First I made a simple fish stock in a small sauce pan with:
2 Cups of WaterThe shells from about 12 shrimp
1/2 an onion
2 cloves garlic (coarsely chopped)
1/4 cup of carrot (coarsely chopped)
1 cup of V-8 Juice
1/2 tsp Salt
I let this cook on low heat for about an hour and a half then pored it through a strainer into a bowl. I put the liquid into the refrigerator until I was ready for it. When it was time to cook I put 1/2 cup rice into a sauce pan and sauteed it in Olive Oil and a clove of minced Garlic once it was completely coated with oil and hot I added one cup of the strained fish stock, turned the heat to low and covered the pan for about 20 minutes.
I cut my Sugar Cane into Skewers about 6 inches long and a little smaller that 1/4 inch thick. It cut into strips very easily, I just ran the knife from top to bottom then I cut a Pineapple into chunks. Then I skewered the shrimp and pineapple alternating, when the Rice was about 10 minutes from done I put the skewered shrimp in the grill and cooked it on a cooler spot for about 10 minutes turning once.
This was a cool dish for a couple of reasons, it just sounds cool to cook on a sugar cane skewer (or am I just a food nerd?) and you do get a little bit of a sweet flavor left inside your shrimp so it is like marinating from the inside too.
Subscribe to:
Posts (Atom)